On the previous post we show why modules are usefull to build Shiny applications. We also saw a first minimal “Hello-World” example.
It can get difficult to share reactive from/to modules. On this post we will see the 3 most common use cases of data workflow :
- Module → Application
- Application → Module
- Application ↔ Module
Want to run the examples ?
All code used in this post are available in Github ardata-fr/Shiny-Modules-Tutorials.
This repository is actually an R package containing all the modules. Applications are stored in the folder inst.
To get apps locally, install the package and run applications as follow :
# install.packages("remotes")
remotes::install_github("ardata-fr/Shiny-Modules-Tutorials")
library(shinyModulesTuto)
# List available applications
listEx()
# Run first application
runEx(listEx()[1])Data from Module to Application
Online application here or get it locally with :
# Run Shiny application
runEx("module-vs-app.R")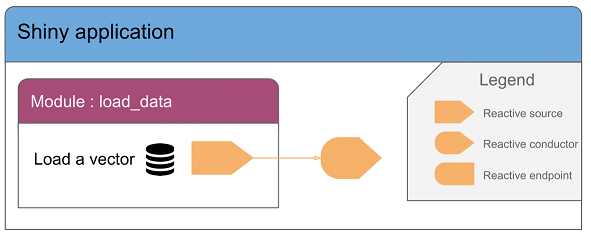
In the module
The reactiveValues returned is created as below :
toReturn <- reactiveValues(
                variables = NULL,
                variable_name = NULL,
                trigger = 0
            )
Updated as any other reactiveValues :
observeEvent(input$AB_load, {
    toReturn$variable       <- get(input$SI_dataset)[,input$SI_var]
    toReturn$variable_name  <- input$SI_var
    toReturn$trigger        <- toReturn$trigger + 1
})
Then it’s returned to application with :
return(toReturn)In the application
Get results from module with :
# results is created as a reactiveValues
# with 3 slots (returned from module)
results <- callModule(module = load_data, id = "id1")
Used in application as a classical reactiveValues :
output$PR_results_print <- renderPrint({
    print(results$variable)
})
Data from Application to Module
Online application here or use command :
# Run Shiny application
runEx("app-vs-module.R")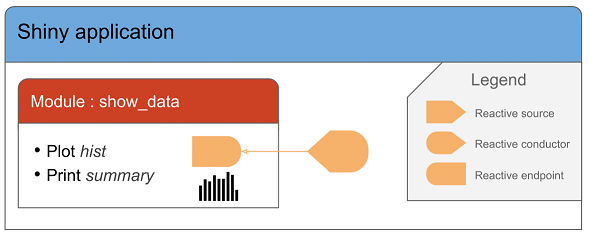
In the application
Solution 1 : Using a reactive
The reactive given to module is created as below :
variable <- reactive({
    iris[, input$SI_colname]
})
Pass the reactive as module parameter :
callModule(module = show_data, id = "id1",
    variable = variable,
    variable_name = reactive(input$SI_colname))
Solution 2 : Using reactiveValues
The reactiveValues given to module is created as below :
rv <- reactiveValues(variable = NULL)

observe({
    rv$variable <- iris[, input$SI_colname]
})
Pass the reactive as module parameter :
callModule(module = show_data, id = "id2",
    variable = reactive(rv$variable),
    variable_name = reactive(input$SI_colname))
In the module
Solution 1 & 2
For both solution using a reactive or a reactiveValues in the application, get parameters on the module using :
output$PL_histogram_var <- renderPlot({
    hist(variable(), main = variable_name(), xlab = NULL)
})
Note that module reactive parameters are used here as any other reactive with variable() & variable_name().
Data from Application modified in Module
Online application here or use command :
# Run Shiny application
runEx("app-pong-module.R")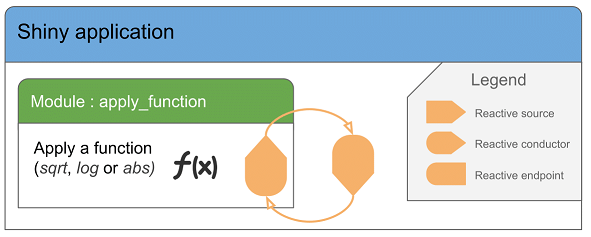
How can I get data in my application and let a module modify them ? The trick here is to use a second reactiveValues.
On this part, we will focus on the application. Because we saw on the previous chapter how to deal with parameters inside module. Let’s consider the module apply_function that takes as parameter a numeric vector on which the user can apply a function. Then the module returns the new numeric vector, the function name used and a “trigger” that increase when the user applies a function.
In the application initialize the reactiveValues as usual :
rv <- reactiveValues(variable = NULL, fun_historic = NULL)

observe({
    rv$variable <- iris[, input$SI_colname]
    rv$fun_historic <- NULL
})
Then pass it to the module as we saw before :
modified_data <- callModule(module = apply_function, id = "id1",
                     variable = reactive(rv$variable))
The output of module apply_function is stored as a reactiveValues.
It contains the 3 slots returned :
- result (the result of the function applied)
- fun (name of the function applied)
- trigger (integer that increases when user applies a function)
To update our rv$variable according to modified_data$result we set an observeEvent on modified_data$trigger :
observeEvent(modified_data$trigger, {
    rv$variable     <- modified_data$result
    rv$fun_historic <- c(rv$fun_historic, modified_data$transformation)
})
The key here is to use a second reactiveValues. So the real schema should be :

Application combining previous examples
Online application here or use command :
# Run Shiny application
runEx("whole-app.R")
This application combines all the modules created so far. The module apply_scale adds a second way of modifying the rv “main” reactiveValue with the function scale. The schema below show that the reactiveValue rv is the core of the application. It contains 2 slots, variable which is the numeric vector and fun_history containing the list of functions applied on our numeric vector.
This rv reactiveValues is initialized/updated in 3 differents ways :
- With output of module load_data using the temporary reactiveValue
data_mod1 - With output of module apply_function using the temporary reactiveValue
data_mod2 - With output of module apply_scale using the temporary reactiveValue
data_mod3
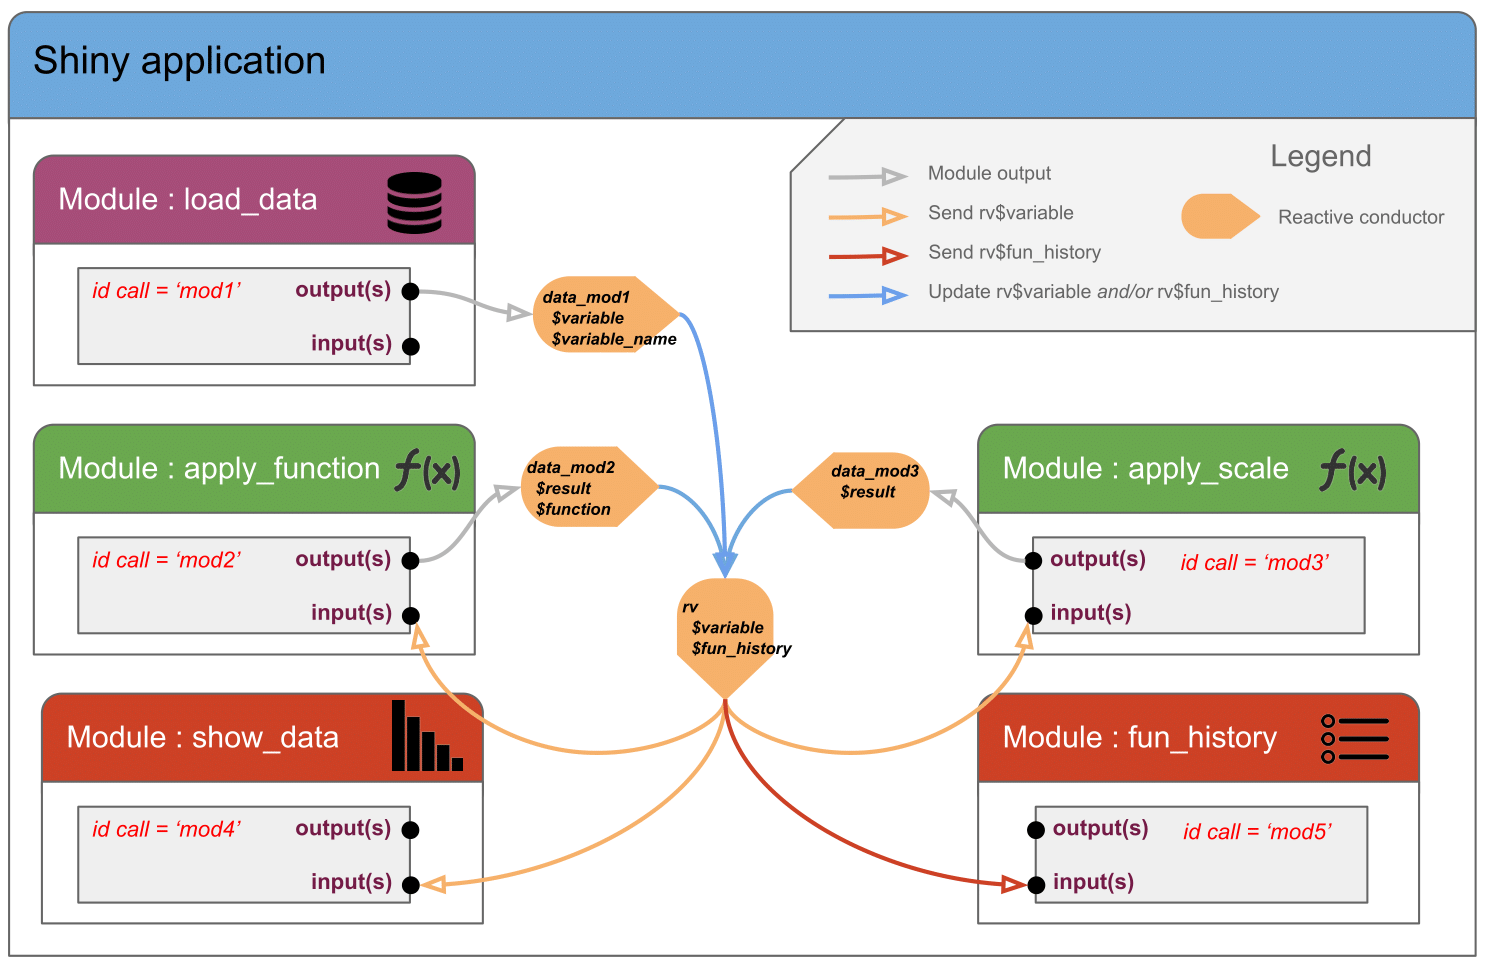
To ease the process of initializing/updating the rv reactiveValue, observeEvent are set on the trigger slot returned by modules. Thus we’re sure that the last user action is taken into account.
Trigger the load or reload from module load_data :
# Call the module load_data
data_mod1 <- callModule(module = load_data, id = "mod1")

# When data_mod1$trigger changes, (re)initialization of rv$variable & rv$fun_history
observeEvent(data_mod1$trigger, {
    req(data_mod1$trigger>0)
    rv$variable    <- data_mod1$variable
    rv$fun_history <- c()
})
Trigger the modification through module apply_function :
# Call the module apply_function with parameter rv$variable
data_mod2 <- callModule(module = apply_function, id = "mod2",
                 variable = reactive(rv$variable))

# When data_mod2$trigger changes, update of rv$variable & rv$fun_history
observeEvent(data_mod2$trigger, {
    req(data_mod2$trigger>0)
    rv$variable    <- data_mod2$result
    rv$fun_history <- c(rv$fun_history, data_mod2$fun)
})
Trigger the modification through module apply_scale :
# Call the module apply_scale with parameter rv$variable
data_mod3 <- callModule(module = apply_scale, id = "mod3",
                 variable = reactive(rv$variable))

# When data_mod3$trigger changes, update of rv$variable & rv$fun_history
observeEvent(data_mod3$trigger, {
    req(data_mod3$trigger>0)
    rv$variable    <- data_mod3$result
    rv$fun_history <- c(rv$fun_history, "scale")
})
Conclusion
We described here (links to applications) :
- How to get data from a module
- How to send data to a module
- How a reactiveValue in the application can be modified inside a module
- An example combining all of cases above
You can now understand why using modules is almost mandatory when building complex/large Shiny applications.
But there’s even more if you want to go further :
- Nested modules (which is actually not complicated at all)
- Dynamic module calls
Before seing this concepts (let’s write a part 3 !!) I hope you will have great time developping your Shiny applications !